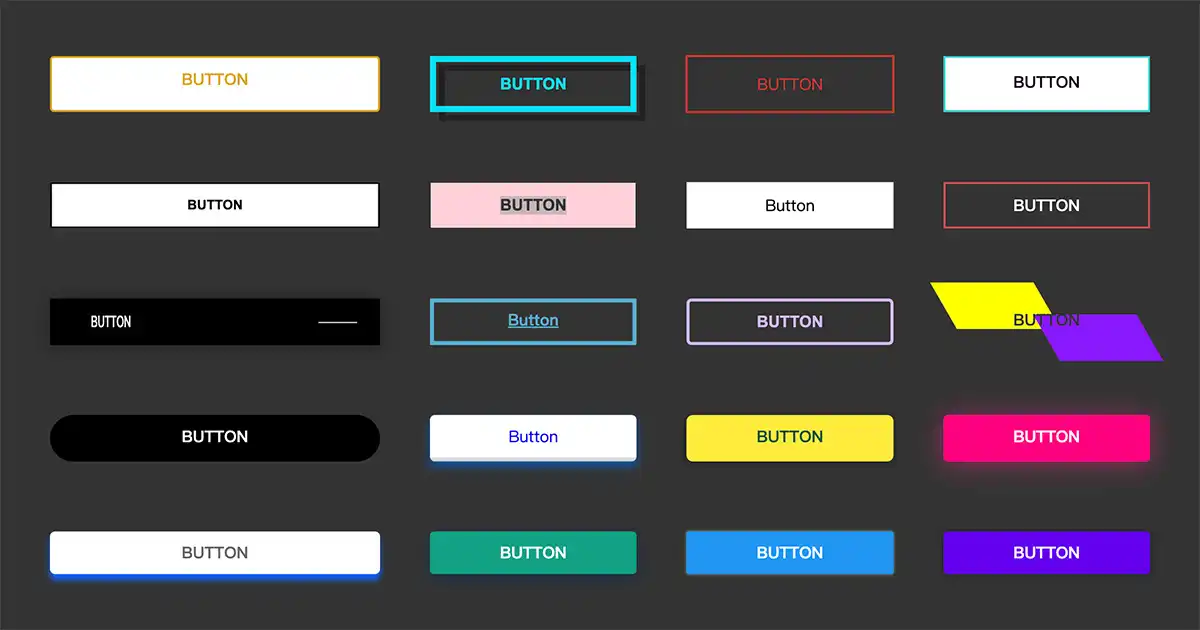
精選 26 個超吸睛的 CSS 按鈕特效
網頁開發CSS 按鈕設計是網站設計中重要的元素之一,設計出吸引人的按鈕能增加使用者互動與體驗,提升網站的訪問量。 本文整理了一些網路上我覺得不錯的 CSS 按鈕特效,並且這些特效完全不會用到 JavaScript,希望能為您的網站設計帶來一些靈感和啟示。 本文提供的程式碼我有經過一些調整,但我會附上原始網址供您參考。
Hover 動畫
在按鈕內使用四個 span,並搭配 translateY 調整 span 位置,製作出泡泡向上的效果。
                            <a href="javascript: void(0)" class="btn">
                                Button
                                <span></span><span></span><span></span><span></span>
                            </a>
                            .btn {
                                display: inline-block;
                                position: relative;
                                z-index: 1;
                                min-width: 200px;
                                background: #FFFFFF;
                                border: 2px solid goldenrod;
                                border-radius: 4px;
                                color: goldenrod;
                                font-size: 1rem;
                                text-transform: uppercase;
                                font-weight: bold;
                                text-align: center;
                                text-decoration: none;
                                overflow: hidden;
                                transition: 0.5s;
                                padding: 10px 20px;
                            }
                            .btn span {
                                position: absolute;
                                width: 25%;
                                height: 100%;
                                background-color: goldenrod;
                                transform: translateY(150%);
                                border-radius: 50%;
                                left: calc((var(--n) - 1) * 25%);
                                transition: 0.5s;
                                transition-delay: calc((var(--n) - 1) * 0.1s);
                                z-index: -1;
                            }
                            .btn:hover,
                            .btn:focus {
                                color: black;
                            }
                            .btn:hover span {
                                transform: translateY(0) scale(2);
                            }
                            .btn span:nth-child(1) {
                                --n: 1;
                            }
                            .btn span:nth-child(2) {
                                --n: 2;
                            }
                            .btn span:nth-child(3) {
                                --n: 3;
                            }
                            .btn span:nth-child(4) {
                                --n: 4;
                            }
使用 :before 及 :after 偽元素製作邊框,觸發 :hover 時,讓 :after 邊框蓋住 :before 邊框。同時,可透過 translateY 改變 span 的位置,製作出向上的泡泡效果,與前一個按鈕的設計方法相似。
                            <button class="btn">
                                Button
                                <span class="inner">
                                    <span class="blob"></span>
                                    <span class="blob"></span>
                                    <span class="blob"></span>
                                    <span class="blob"></span>
                                </span>
                            </button>
                        btn
                            .btn {
                                position: relative;
                                z-index: 1;
                                min-width: 200px;
                                background-color: transparent;
                                border: none;
                                color: #0fe0f5;
                                font-size: 1rem;
                                font-weight: bold;
                                text-align: center;
                                text-decoration: none;
                                text-transform: uppercase;
                                transition: color 0.5s;
                                padding: 12px 20px;
                            }
                            .btn:before {
                                content: "";
                                position: absolute;
                                left: 0;
                                top: 0;
                                width: 100%;
                                height: 100%;
                                z-index: 1;
                                border: 6px solid #0fe0f5;
                            }
                            .btn:after {
                                content: "";
                                position: absolute;
                                left: 9px;
                                top: 9px;
                                width: 100%;
                                height: 100%;
                                z-index: -2;
                                border: 6px solid #222222;
                                transition: all 0.3s 0.2s;
                            }
                            .btn:hover {
                                color: #222222;
                            }
                            .btn:hover:after {
                                transition: all 0.3s;
                                left: 0;
                                top: 0;
                            }
                            .btn .inner {
                                position: absolute;
                                left: 0;
                                top: 0;
                                width: 100%;
                                height: 100%;
                                z-index: -1;
                                overflow: hidden;
                            }
                            .btn .inner .blob {
                                position: absolute;
                                top: 6px;
                                width: 25%;
                                height: 100%;
                                background: #0fe0f5;
                                border-radius: 100%;
                                transform: translate3d(0, 150%, 0) scale(1.7);
                                transition: transform 0.45s;
                            }
                            .btn .inner .blob:nth-child(1) {
                                left: 0%;
                                transition-delay: 0s;
                            }
                            .btn .inner .blob:nth-child(2) {
                                left: 30%;
                                transition-delay: 0.08s;
                            }
                            .btn .inner .blob:nth-child(3) {
                                left: 60%;
                                transition-delay: 0.16s;
                            }
                            .btn .inner .blob:nth-child(4) {
                                left: 90%;
                                transition-delay: 0.24s;
                            }
                            .btn:hover .inner .blob {
                                transform: translateZ(0) scale(1.7);
                            }
使用 :before 製作左邊粉紅圓點,觸發 :hover 時,讓 :before 寬度變成 100%。
                            <a href="javascript: void(0)" class="btn">
                                <span>Button</span>
                                <svg width="13px" height="10px" viewBox="0 0 13 10">
                                    <path d="M1,5 L11,5"></path>
                                    <polyline points="8 1 12 5 8 9"></polyline>
                                </svg>
                            </a>
                            .btn {
                                position: relative;
                                color: #111111;
                                font-size: 1rem;
                                text-transform: uppercase;
                                font-weight: bold;
                                text-align: center;
                                text-decoration: none;
                                transition: all 0.2s ease;
                                padding: 12px 20px;
                                display: inline-flex;
                                flex-direction: row;
                                align-items: center;
                                justify-content: center;
                            }
                            .btn:before {
                                content: "";
                                position: absolute;
                                top: 0;
                                left: 0;
                                display: block;
                                border-radius: 28px;
                                background: rgba(255, 171, 157, 0.5);
                                width: 56px;
                                height: 56px;
                                transition: all 0.3s ease;
                            }
                            .btn span {
                                position: relative;
                                z-index: 1;
                            }
                            .btn svg {
                                position: relative;
                                top: 0;
                                margin-left: 10px;
                                fill: none;
                                stroke-linecap: round;
                                stroke-linejoin: round;
                                stroke: #111111;
                                stroke-width: 2;
                                transform: translateX(-5px);
                                transition: all 0.3s ease;
                            }
                            .btn:hover:before {
                                width: 100%;
                                background: #FFAB9D;
                            }
                            .btn:hover svg {
                                transform: translateX(0);
                            }
                            .btn:hover,
                            .btn:focus {
                                color: #111111;
                            }
                            .btn:active {
                                color: #111111;
                                transform: scale(0.96);
                            }
整體而言,與前一個按鈕的設計方法相似,但額外使用 mix-blend-mode: difference 讓文字顏色與背景色形成強烈對比。
                            <button class="btn">
                                <span>Button</span>
                            </button>
                            .btn {
                                position: relative;
                                min-width: 160px;
                                background: transparent;
                                border: none;
                                border-radius: 50px;
                                font-size: 1rem;
                                font-weight: bold;
                                text-align: center;
                                text-decoration: none;
                                text-transform: uppercase;
                                padding: 10px 20px;
                            }
                            .btn span {
                                color: #FFFFFF;
                                mix-blend-mode: difference;
                            }
                            .btn:before {
                                content: '';
                                position: absolute;
                                top: 0;
                                left: 0;
                                width: 52px;
                                height: 100%;
                                border-radius: 50px;
                                background: black;
                                transition: all 0.85s cubic-bezier(0.68, -0.55, 0.265, 1.55);
                            }
                            .btn:hover:before {
                              background: black;
                              width: 100%;
                            }
使用 outline 製作邊框往外淡出的效果,並搭配內陰影讓按鈕更有層次。
                            <a href="javascript: void(0)" class="btn">
                                Button
                            </a>
                            .btn,
                            .btn:focus {
                                position: relative;
                                min-width: 200px;
                                background: transparent;
                                color: #E1332D;
                                font-size: 1rem;
                                text-align: center;
                                text-transform: uppercase;
                                text-decoration: none;
                                box-sizing: inherit;
                                padding: 10px 20px;
                                border: 1px solid;
                                box-shadow: inset 0 0 20px rgba(225, 51, 45, 0);
                                outline: 1px solid !important;
                                outline-color: rgba(225, 51, 45, 0.5);
                                outline-offset: 0px;
                                text-shadow: none;
                                transition: all 1250ms cubic-bezier(0.19, 1, 0.22, 1);
                            }
                            .btn:hover {
                                color: #E1332D;
                                border: 1px solid;
                                box-shadow: inset 0 0 20px rgba(225, 51, 45, 0.5), 0 0 20px rgba(225, 51, 45, 0.2);
                                outline: 1px solid !important;
                                outline-color: rgba(225, 51, 45, 0) !important;
                                outline-offset: 15px;
                                text-shadow: 1px 1px 2px #427388;
                            }
                            <a href="javascript: void(0)" class="btn">
                                <div>
                                    <span>Button</span>
                                    <span>Button</span>
                                </div>
                            </a>
                            .btn {
                                position: relative;
                                min-width: 200px;
                                background: #FFFFFF;
                                border: 2px solid #3AD2D0;
                                transform: translate3d(0px, 0%, 0px);
                                font-size: 1rem;
                                font-weight: bold;
                                text-align: center;
                                text-decoration: none;
                                transition-delay: 0.6s;
                                overflow: hidden;
                                padding: 10px 20px;
                            }
                            .btn:before,
                            .btn:after {
                                content: '';
                                position: absolute;
                                top: 0px;
                                left: 0px;
                                width: 100%;
                                height: 100%;
                                transition: all 0.6s ease;
                            }
                            .btn:before {
                                background: #3AD2D0;
                                border-radius: 50% 50% 0 0;
                                transform: translateY(100%) scaleY(0.5);
                            }
                            .btn:after {
                                background: #FFFFFF;
                                border-radius: 0;
                                transform: translateY(0) scaleY(1);
                            }
                            .btn div {
                                position: relative;
                                top: 0px;
                                left: 0px;
                                width: 100%;
                                height: 32px;
                                text-transform: uppercase;
                                overflow: hidden;
                            }
                            .btn span {
                                position: absolute;
                                left: 0px;
                                top: 0px;
                                width: 100%;
                                z-index: 1;
                                text-align: center;
                                transition: transform 0.5s ease;
                            }
                            .btn span:first-child {
                                color: #FFFFFF;
                                transform: translateY(24px);
                            }
                            .btn span:last-child {
                                color: #1E0F21;
                                transform: translateY(0);
                            }
                            .btn:hover {
                                background: #3AD2D0;
                                transition: background 0.2s linear;
                                transition-delay: 0.6s;
                                color: #FFFFFF;
                            }
                            .btn:hover:after {
                                border-radius: 0 0 50% 50%;
                                transform: translateY(-100%) scaleY(0.5);
                                transition-delay: 0;
                            }
                            .btn:hover:before {
                                border-radius: 0;
                                transform: translateY(0) scaleY(1);
                                transition-delay: 0;
                            }
                            .btn:hover span:first-child {
                                transform: translateY(0);
                            }
                            .btn:hover span:last-child {
                                transform: translateY(-32px);
                            }
使用 :before 偽元素製作區塊,並透過 attr(data-hover) 顯示文字,觸發 :hover 時,讓 :before 與原本的 div 都往右邊移動 100 %。
                            <button class="btn" data-hover="click me!">
                                <div>Button</div>
                            </button>
                            .btn {
                                position: relative;
                                min-width: 200px;
                                background: #FFFFFF;
                                border: 2px solid #111111;
                                overflow: hidden;
                            }
                            .btn div,
                            .btn:before {
                                font-size: 1em;
                                font-weight: bold;
                                text-transform: uppercase;
                                transition: all .3s ease-in-out;
                                padding: 10px 20px;
                            }
                            .btn:before {
                                content: attr(data-hover);
                                position: absolute;
                                top: 0;
                                left: 0;
                                width: 100%;
                                opacity: 0;
                                transform: translate(-100%, 0);
                            }
                            .btn:hover div {
                                opacity: 0;
                                transform: translate(100%, 0)
                            }
                            .btn:hover:before {
                                opacity: 1;
                                transform: translate(0, 0);
                            }
使用 :before 及 :after 偽元素製作白色及粉紅色背景,觸發 :hover 時,先讓 :before 由左至右拉長,再讓 :after 由右至左拉長。
                            <button class="btn">
                                <span>Button</span>
                            </button>
                            .btn {
                                position: relative;
                                min-width: 200px;
                                background: #333333;
                                border: 1px solid #333333;
                                color: #FFFFFF;
                                font-size: 1rem;
                                font-weight: bold;
                                text-align: center;
                                text-decoration: none;
                                text-transform: uppercase;
                                overflow: hidden;
                                padding: 10px 20px;
                            }
                            .btn span {
                                position: relative;
                                z-index: 100;
                            }
                            .btn:before,
                            .btn:after {
                                content: '';
                                position: absolute;
                                height: 100%;
                                width: 100%;
                                top: 0;
                                left: 0;
                            }
                            .btn:before {
                                transform: translate3d(-100%, 0, 0);
                                background-color: #FFFFFF;
                                transition: transform 300ms cubic-bezier(0.55, 0.055, 0.675, 0.19);
                            }
                            .btn:after {
                                background-color: #ffd1d8;
                                transform: translate3d(100%, 0, 0);
                                transition: transform 300ms 300ms cubic-bezier(0.16, 0.73, 0.58, 0.62);
                            }
                            .btn:hover:before {
                                transform: translate3d(0, 0, 0);
                            }
                            .btn:hover:after {
                                transform: translate3d(0, 0, 0);
                            }
將 t、h、a、n、k、s 分別使用 span 元素包裹起來,觸發 :hover 時,讓每個文字以不同的速度落下。
                            <a href="javascript: void(0)" class="btn" data-text="Button">
                              <span>T</span>
                              <span>h</span>
                              <span>a</span>
                              <span>n</span>
                              <span>k</span>
                              <span>s</span>
                            </a>
                            .btn {
                                position: relative;
                                z-index: 1;
                                min-width: 200px;
                                background: #FFFFFF;
                                color: black !important;
                                text-align: center;
                                padding: 12px 20px;
                            }
                            .btn span {
                                display: inline-block;
                                font-size: 1rem;
                                font-weight: bold;
                                text-align: center;
                                text-decoration: none;
                                text-transform: uppercase;
                                opacity: 0;
                                transform: translate(0, -20px);
                                transition: 0.25s cubic-bezier(0.5, -1, 0.5, 2);
                            }
                            .btn:before {
                                content: attr(data-text);
                                position: absolute;
                                width: 100%;
                                left: 0;
                                font-size: 1rem;
                                font-weight: bold;
                                text-align: center;
                                text-decoration: none;
                                text-transform: uppercase;
                                letter-spacing: 3.5px;
                                opacity: 1;
                                transform: translate(0, 0px);
                                transition: 0.25s cubic-bezier(0.5, -1, 0.5, 2);
                            }
                            .btn:hover:before,
                            .btn:focus:before {
                                opacity: 0;
                                transform: translate(0, 20px);
                            }
                            .btn:hover span,
                            .btn:focus span {
                                opacity: 1;
                                transform: translate(0, 0);
                            }
                            .btn:hover span:nth-child(1),
                            .btn:focus span:nth-child(1) {
                                transition-delay: 0.025s;
                            }
                            .btn:hover span:nth-child(2),
                            .btn:focus span:nth-child(2) {
                                transition-delay: 0.05s;
                            }
                            .btn:hover span:nth-child(3),
                            .btn:focus span:nth-child(3) {
                                transition-delay: 0.075s;
                            }
                            .btn:hover span:nth-child(4),
                            .btn:focus span:nth-child(4) {
                                transition-delay: 0.1s;
                            }
                            .btn:hover span:nth-child(5),
                            .btn:focus span:nth-child(5) {
                                transition-delay: 0.125s;
                            }
                            .btn:hover span:nth-child(6),
                            .btn:focus span:nth-child(6) {
                                transition-delay: 0.15s;
                            }
使用 :after 製作紅色展開區塊,並使用 rotate 讓區塊傾斜一些角度。
                            <a href="javascript: void(0)" class="btn">
                                Button
                            </a>
                            .btn,
                            .btn:focus {
                                position: relative;
                                z-index: 1;
                                min-width: 200px;
                                border: 2px solid #D24D57;
                                border-radius: 0;
                                color: #FFFFFF;
                                font-size: 1rem;
                                font-weight: bold;
                                text-align: center;
                                text-decoration: none;
                                text-transform: uppercase;
                                overflow: hidden;
                                text-shadow: 0 0 1px rgba(0, 0, 0, 0.2), 0 1px 0 rgba(0, 0, 0, 0.2);
                                -webkit-transition: all 1s ease;
                                -moz-transition: all 1s ease;
                                -o-transition: all 1s ease;
                                transition: all 1s ease;
                                padding: 10px 20px;
                            }
                            .btn:after {
                                content: "";
                                position: absolute;
                                height: 0%;
                                left: 50%;
                                top: 50%;
                                width: 150%;
                                z-index: -1;
                                background: #D24D57;
                                -moz-transform: translateX(-50%) translateY(-50%) rotate(-25deg);
                                -ms-transform: translateX(-50%) translateY(-50%) rotate(-25deg);
                                -webkit-transform: translateX(-50%) translateY(-50%) rotate(-25deg);
                                transform: translateX(-50%) translateY(-50%) rotate(-25deg);
                                -webkit-transition: all 0.75s ease 0s;
                                -moz-transition: all 0.75s ease 0s;
                                -o-transition: all 0.75s ease 0s;
                                transition: all 0.75s ease 0s;
                            }
                            .btn:hover {
                                color: #FFFFFF;
                                text-shadow: none;
                            }
                            .btn:hover:after {
                                height: 450%;
                            }
使用 :before 及 :after 分別製作上下兩個白色區塊,並使用 em 元素製作右方中間的白線。
                            <a href="javascript: void(0)" class="btn">
                                <span>Button</span>
                                <em></em>
                            </a>
                            .btn {
                                position: relative;
                                z-index: 1;
                                min-width: 330px;
                                background-color: #000000;
                                overflow: hidden;
                                box-shadow: 0px 0px 17px 1px rgba(0, 0, 0, 0.34);
                                padding: 12px 20px;
                                text-decoration: none;
                            }
                            .btn span {
                                color: #ffffff;
                                font-size: 1rem;
                                font-weight: bold;
                                text-align: left;
                                text-decoration: none;
                                text-transform: uppercase;;
                                padding-left: 35px;
                                display: block;
                                transform: scaleX(0.6);
                                transform-origin: center left;
                                transition: color 0.3s ease;
                                position: relative;
                                z-index: 1;
                            }
                            .btn em {
                                position: absolute;
                                height: 1px;
                                width: 47%;
                                right: 23px;
                                top: 50%;
                                background: #ffffff;
                                transform: scaleX(0.25);
                                transform-origin: center right;
                                transition: all 0.3s ease;
                                z-index: 1;
                            }
                            .btn:before,
                            .btn:after {
                                content: '';
                                position: absolute;
                                height: 50%;
                                width: 0;
                                background: #ffffff;
                                transition: 0.3s cubic-bezier(0.785, 0.135, 0.15, 0.86);
                            }
                            .btn:before {
                                top: 0;
                                left: 0;
                                right: auto;
                            }
                            .btn:after {
                                bottom: 0;
                                right: 0;
                                left: auto;
                            }
                            .btn:hover:before {
                                width: 100%;
                                right: 0;
                                left: auto;
                            }
                            .btn:hover:after {
                                width: 100%;
                                left: 0;
                                right: auto;
                            }
                            .btn:hover span {
                                color: #000000;
                            }
                            .btn:hover em {
                                background: #000;
                                transform: scaleX(1);
                            }
使用 :after 製作粉紅背景區塊,並使用 translate 及 rotate 先將區塊移動到畫面之外。當觸發 :hover 時,再讓 :after 回到按鈕位置。
                            <a href="javascript: void(0)" class="btn">
                                Button
                            </a>
                            .btn,
                            .btn:focus {
                                position: relative;
                                z-index: 0;
                                min-width: 200px;
                                border: 2px solid currentColor;
                                border-radius: 48px;
                                color: #FF0FF0;
                                font-size: 1rem;
                                text-align: center;
                                text-decoration: none;
                                overflow: hidden;
                                transition: 0.2s transform ease-in-out;
                                will-change: transform;
                                padding: 10px 20px;
                            }
                            .btn:after {
                                content: '';
                                display: block;
                                position: absolute;
                                height: 100%;
                                width: 100%;
                                left: 0;
                                top: 0;
                                z-index: -1;
                                background-color: #ff0ff0;
                                border-radius: 3rem;
                                transform: translate(-100%, 0) rotate(10deg);
                                transform-origin: top left;
                                transition: 0.2s transform ease-out;
                                will-change: transform;
                            }
                            .btn:hover:after {
                                transform: translate(0, 0);
                            }
                            .btn:hover {
                                border: 2px solid transparent;
                                color: #FFFFFF;
                                transform: scale(1.05);
                                will-change: transform;
                            }
使用 :before 及 :after 製作兩條線,藉由控制線條出現起始點及終點,就能製作很棒的效果了。
                            <a href="javascript: void(0)" class="btn from-top">
                                Button (From Top)
                            </a>
                            <a href="javascript: void(0)" class="btn from-bottom">
                                Button (From Bottom)
                            </a>
                            <a href="javascript: void(0)" class="btn from-left">
                                Button (From Left)
                            </a>
                            <a href="javascript: void(0)" class="btn from-right">
                                Button (From Right)
                            </a>
                            <a href="javascript: void(0)" class="btn from-center">
                                Button (From Center)
                            </a>
                            .btn,
                            .btn:focus {
                                display: block;
                                position: relative;
                                z-index: 1;
                                min-width: 200px;
                                color: #FFFFFF;
                                font-size: 1rem;
                                font-weight: bold;
                                text-align: center;
                                text-decoration: none;
                                text-transform: uppercase;
                                transition: all 500ms cubic-bezier(0.77, 0, 0.175, 1);
                                padding: 10px 20px;
                                margin: 10px 0px;
                            }
                            .btn:before,
                            .btn:after {
                                content: '';
                                position: absolute;
                                transition: inherit;
                                z-index: -1;
                            }
                            .btn:hover {
                                color: #333333;
                                transition-delay: .5s;
                            }
                            .btn:hover:before {
                                transition-delay: 0s;
                            }
                            .btn:hover:after {
                                background: #FFFFFF;
                                transition-delay: .35s;
                            }
                            .btn.from-top:before,
                            .btn.from-top:after {
                                left: 0;
                                height: 0;
                                width: 100%;
                            }
                            .btn.from-top:before {
                                bottom: 0;
                                border: 1px solid #FFFFFF;
                                border-top: 0;
                                border-bottom: 0;
                            }
                            .btn.from-top:after {
                                top: 0;
                                height: 0;
                            }
                            .btn.from-top:hover:before,
                            .btn.from-top:hover:after {
                                height: 100%;
                            }
                            .btn.from-bottom:before,
                            .btn.from-bottom:after {
                                left: 0;
                                height: 0;
                                width: 100%;
                            }
                            .btn.from-bottom:before {
                                top: 0;
                                border: 1px solid #FFFFFF;
                                border-top: 0;
                                border-bottom: 0;
                            }
                            .btn.from-bottom:after {
                                bottom: 0;
                                height: 0;
                            }
                            .btn.from-bottom:hover:before,
                            .btn.from-bottom:hover:after {
                                height: 100%;
                            }
                            .btn.from-left:before,
                            .btn.from-left:after {
                                top: 0;
                                width: 0;
                                height: 100%;
                            }
                            .btn.from-left:before {
                                right: 0;
                                border: 1px solid #FFFFFF;
                                border-left: 0;
                                border-right: 0;
                            }
                            .btn.from-left:after {
                                left: 0;
                            }
                            .btn.from-left:hover:before,
                            .btn.from-left:hover:after {
                                width: 100%;
                            }
                            .btn.from-right:before,
                            .btn.from-right:after {
                                top: 0;
                                width: 0;
                                height: 100%;
                            }
                            .btn.from-right:before {
                                left: 0;
                                border: 1px solid #FFFFFF;
                                border-left: 0;
                                border-right: 0;
                            }
                            .btn.from-right:after {
                                right: 0;
                            }
                            .btn.from-right:hover:before,
                            .btn.from-right:hover:after {
                                width: 100%;
                            }
                            .btn.from-center:before {
                                top: 0;
                                left: 50%;
                                height: 100%;
                                width: 0;
                                border: 1px solid #FFFFFF;
                                border-left: 0;
                                border-right: 0;
                            }
                            .btn.from-center:after {
                                bottom: 0;
                                left: 0;
                                height: 0;
                                width: 100%;
                                background: #FFFFFF;
                            }
                            .btn.from-center:hover:before {
                                left: 0;
                                width: 100%;
                            }
                            .btn.from-center:hover:after {
                                top: 0;
                                height: 100%;
                            }
使用四個 span 元素製作四條線,並讓每兩條線頭尾相連,看起來就好像只有兩條線在移動。
                            <a href="javascript: void(0)" class="btn">
                                Button
                                <span></span>
                                <span></span>
                                <span></span>
                                <span></span>
                            </a>
                            .btn,
                            .btn:focus,
                            .btn:hover {
                                position: relative;
                                min-width: 200px;
                                border: 1px solid #FFFFFF;
                                color: #FFFFFF;
                                font-size: 1rem;
                                font-weight: bold;
                                text-align: center;
                                text-decoration: none;
                                text-transform: uppercase;
                                -webkit-font-smoothing: antialiased;
                                padding: 10px 20px;
                            }
                            .btn span:nth-child(1),
                            .btn span:nth-child(2),
                            .btn span:nth-child(3),
                            .btn span:nth-child(4) {
                                content: "";
                                display: block;
                                position: absolute;
                                background-color: #FFFFFF;
                            }
                            .btn span:nth-child(1) {
                                width: 1px;
                                left: 0;
                                bottom: 0;
                            }
                            .btn span:nth-child(2) {
                                height: 1px;
                                left: 0;
                                top: 0;
                            }
                            .btn span:nth-child(3) {
                                width: 1px;
                                right: 0;
                                top: 0;
                            }
                            .btn span:nth-child(4) {
                                height: 1px;
                                right: 0;
                                bottom: 0;
                            }
                            .btn:hover {
                                border: none;
                            }
                            .btn:hover span:nth-child(1) {
                                animation: move1 1500ms infinite ease;
                            }
                            .btn:hover span:nth-child(2) {
                                animation: move2 1500ms infinite ease;
                            }
                            .btn:hover span:nth-child(3) {
                                animation: move3 1500ms infinite ease;
                            }
                            .btn:hover span:nth-child(4) {
                                animation: move4 1500ms infinite ease;
                            }
                            @keyframes move1 {
                                0% { height: 100%; bottom: 0; }
                                54% { height: 0; bottom: 100%; }
                                55% { height: 0; bottom: 0; }
                                100% { height: 100%; bottom: 0; }
                            }
                            @keyframes move2 {
                                0% { width: 0; left: 0; }
                                50% { width: 100%; left: 0; }
                                100% { width: 0; left: 100%; }
                            }
                            @keyframes move3 {
                                0% { height: 100%; top: 0; }
                                54% { height: 0; top: 100%; }
                                55% { height: 0; top: 0; }
                                100% { height: 100%; top: 0; }
                            }
                            @keyframes move4 {
                                0% { width: 0; right: 0; }
                                55% { width: 100%; right: 0; }
                                100% { width: 0; right: 100%; }
                            }
使用 :before 及 :after 製作兩個區塊,並讓兩個區塊重疊放置在按鈕右下角,:before 區塊下方及左方設定 border,而 :after 區塊則是上方及右方設定 border。當觸發 :hover 時,讓兩個區塊依序放大。
                            <a href="javascript: void(0)" class="btn">
                                Button
                            </a>
                            .btn,
                            .btn:focus {
                                position: relative;
                                min-width: 200px;
                                background: none;
                                border: none;
                                color: #58afd1;
                                font-size: 1rem;
                                font-weight: bold;
                                text-align: center;
                                text-decoration: none;
                                box-shadow: inset 0 0 0 4px #58afd1;
                                transition: color 0.25s 0.0833333333s;
                                padding: 10px 20px;
                            }
                            .btn:before,
                            .btn:after {
                                content: "";
                                position: absolute;
                                width: 0;
                                height: 0;
                                bottom: 0;
                                right: 0;
                                border: 0 solid transparent;
                                box-sizing: border-box;
                            }
                            .btn:before {
                                border-bottom-width: 4px;
                                border-left-width: 4px;
                            }
                            .btn:after {
                                border-top-width: 4px;
                                border-right-width: 4px;
                            }
                            .btn:hover {
                                color: #ffe593;
                            }
                            .btn:hover:before,
                            .btn:hover:after {
                                border-color: #ffe593;
                                transition: border-color 0s, width 0.25s, height 0.25s;
                                width: 100%;
                                height: 100%;
                            }
                            .btn:hover:before {
                                transition-delay: 0s, 0s, 0.25s;
                            }
                            .btn:hover:after {
                                transition-delay: 0s, 0.25s, 0s;
                            }
使用 :before 及 :after 製作兩個背景透明區塊,讓這兩個區塊大於按鈕區塊。當觸發 :hover 時,使用內陰影方式製造兩個區塊的背景,就能呈現出背景顏色由外往內縮的視覺效果。
                            <button href="javascript: void(0)" class="btn">
                                <span>Button</span>
                            </button>
                            .btn {
                                position: relative;
                                min-width: 200px;
                                border: 3px solid #d3b7f7;
                                border-radius: 5px;
                                background: transparent;
                                color: #d3b7f7;
                                font-size: 1rem;
                                font-weight: bold;
                                text-align: center;
                                text-decoration: none;
                                text-transform: uppercase;
                                transition: border 0.5s ease-out;
                                transition-delay: 0.8s;
                                overflow: hidden;
                                transition: 0.5s;
                                padding: 10px 20px;
                            }
                            .btn:before,
                            .btn:after {
                                position: absolute;
                                top: 0;
                                left: 0;
                                right: 0;
                                bottom: 0;
                                z-index: 0;
                                margin: auto;
                                content: 'Button';
                                border-radius: 50%;
                                display: block;
                                width: 22em;
                                height: 22em;
                                left: -5.5em;
                                text-align: center;
                                transition: box-shadow 0.5s ease-out;
                                transition-delay: 0.75s;
                            }
                            .btn:after {
                                transition-delay: 0.25s;
                            }
                            .btn span {
                                position: relative;
                                z-index: 1;
                            }
                            .btn:hover {
                                color: #ffffff;
                                border-color: #8460af;
                                animation: anim 1.5s ease;
                                transition: border 0.2s ease;
                            }
                            .btn:hover::before {
                                box-shadow: inset 0 0 0 11em #b657e5;
                                transition-delay: 0.05s;
                            }
                            .btn:hover::after {
                                box-shadow: inset 0 0 0 11em #8460af;
                                transition-delay: 0.5s;
                            }
                            @keyframes anim {
                                0% { color: #d3b7f7; }
                                50% { color: #50514f; }
                                100% { color: #ffffff; }
                            }
使用 :before 及 :after 分別製作左右黃色與紫色區塊,並搭配 skewX 讓區塊變成平行四邊形。
                            <a href="javascript: void(0)" class="btn">
                                <span>Button</span>
                            </a>
                            .btn,
                            .btn:focus,
                            .btn:hover {
                                position: relative;
                                min-width: 200px;
                                background: transparent;
                                color: #333333;
                                font-size: 1rem;
                                font-weight: bold;
                                text-align: center;
                                text-decoration: none;
                                text-transform: uppercase;
                                padding: 10px 20px;
                            }
                            .btn:after,
                            .btn:before {
                                content: "";
                                position: absolute;
                                height: 100%;
                                width: 50%;
                                transform: skewX(30deg);
                                transition: all 0.5s cubic-bezier(0.68, -0.55, 0.265, 1.55);
                                z-index: 0;
                            }
                            .btn:before {
                                background-color: #ffff00;
                                top: -16px;
                                left: 0px;
                            }
                            .btn:after {
                                background-color: #8a19ff;
                                top: 16px;
                                left: 50%;
                            }
                            .btn span {
                                position: relative;
                                z-index: 1;
                            }
                            .btn:hover:before,
                            .btn:hover:after {
                                top: 0;
                                transform: skewx(0deg);
                            }
                            .btn:hover:after {
                                left: 0rem;
                            }
                            .btn:hover:before {
                                left: 50%;
                            }
使用多層陰影製作展開效果。
                            <a href="javascript: void(0)" class="btn">
                                +
                            </a>
                            .btn,
                            .btn:hover,
                            .btn:focus {
                                display: flex;
                                align-items: center;
                                justify-content: center;
                                position: relative;
                                z-index: 1;
                                width: 80px;
                                height: 80px;
                                border-radius: 50%;
                                border: none;
                                background: #ed1c5b;
                                color: #1a1a1a;
                                font-size: 2rem;
                                transition: box-shadow 400ms cubic-bezier(0.2, 0, 0.7, 1), transform 200ms cubic-bezier(0.2, 0, 0.7, 1);
                            }
                            .btn:hover {
                                transform: rotate(45deg);
                                box-shadow: 0 0 1px 15px rgba(138, 59, 88, 0.4), 0 0 1px 30px rgba(138, 59, 88, 0.1), 0 0 1px 45px rgba(138, 59, 88, 0.1);
                            }
Click 動畫
使用陰影搭配透明度,製作白色陰影往外擴散的感覺。
                            <a href="javascript: void(0)" class="btn">
                                Button
                            </a>
                            .btn,
                            .btn:focus {
                                position: relative;
                                min-width: 200px;
                                background-color: black;
                                border-radius: 4em;
                                color: white;
                                font-size: 1rem;
                                font-weight: bold;
                                text-align: center;
                                text-decoration: none;
                                text-transform: uppercase;
                                transition-duration: 0.4s;
                                padding: 10px 20px;
                            }
                            .btn:hover {
                                background-color: #3A3A3A;
                                color: white;
                                transition-duration: 0.1s;
                            }
                            .btn:after {
                                content: "";
                                display: block;
                                position: absolute;
                                left: 0;
                                top:0;
                                width: 100%;
                                height: 100%;
                                opacity: 0;
                                transition: all 0.5s;
                                box-shadow: 0 0 10px 40px white;
                                border-radius: 4em;
                            }
                            .btn:active:after {
                                opacity: 1;
                                transition: 0s;
                                box-shadow: 0 0 0 0 white;
                            }
                            .btn:active {
                                top: 1px;
                            }
使用陰影搭配縮放。
                            <a href="javascript: void(0)" class="btn">
                                Button
                            </a>
                            .btn {
                                min-width: 200px;
                                background-color: #fff;
                                border: 0;
                                border-radius: 5px;
                                border-bottom: 4px solid #d9d9d9;
                                font-size: 1rem;
                                text-align: center;
                                text-decoration: none;
                                box-shadow: 0px 5px 10px #0057ab;
                                transition: all 0.3s;
                                padding: 10px 20px;
                            }
                            .btn:hover {
                                box-shadow: 0px 15px 25px -5px #0057ab;
                                transform: scale(1.03);
                            }
                            .btn:active {
                                box-shadow: 0px 4px 8px #0065c8;
                                transform: scale(0.98);
                            }
使用八個 span 製作點擊往外擴散的八個小點,作者使用 JavaScript 在 onClick 事件加入動畫,以下改使用 CSS 的 :active 偽元素完成相似功能。
                            <a href="javascript: void(0)" class="btn">
                                <span class="dot"></span>
                                <span class="dot"></span>
                                <span class="dot"></span>
                                <span class="dot"></span>
                                <span class="dot"></span>
                                <span class="dot"></span>
                                <span class="dot"></span>
                                <span class="dot"></span>
                                <span class="text">Button</span>
                            </a>
                            .btn,
                            .btn:focus {
                                position: relative;
                                min-width: 200px;
                                border: 0;
                                border-radius: 0.4rem;
                                background: #FFEB3B;
                                color: #004D40;
                                font-size: 1rem;
                                font-weight: bold;
                                text-align: center;
                                text-decoration: none;
                                text-transform: uppercase;
                                box-shadow: -1px 1px 8px rgba(0, 0, 0, 0.4);
                                transition: background 250ms, box-shadow 250ms;
                                padding: 10px 20px;
                            }
                            .btn:hover {
                                color: #004D40;
                                background: #FDD835;
                                box-shadow: -2px 2px 16px rgba(0, 0, 0, 0.6);
                            }
                            .btn:active {
                                box-shadow: -4px 4px 24px rgba(0, 0, 0, 0.8);
                            }
                            .btn .text {
                                position: relative;
                                z-index: 2;
                            }
                            .btn .dot {
                                position: absolute;
                                z-index: 0;
                                display: block;
                                width: 200px;
                                height: 10px;
                                transform-origin: 5px 5px;
                                pointer-events: none;
                            }
                            .btn .dot:nth-child(1) {
                                top: 50%;
                                left: 100%;
                                transform: translate3d(-10px, -5px, 0);
                            }
                            .btn .dot:nth-child(2) {
                                bottom: 0;
                                left: 100%;
                                transform: translate3d(-10px, 0, 0) rotate(45deg);
                            }
                            .btn .dot:nth-child(3) {
                                bottom: 0;
                                left: 50%;
                                transform: translate3d(-5px, 0, 0) rotate(90deg);
                            }
                            .btn .dot:nth-child(4) {
                                bottom: 0;
                                left: 0;
                                transform: rotate(135deg);
                            }
                            .btn .dot:nth-child(5) {
                                top: 50%;
                                left: 0;
                                transform: translate3d(0, -5px, 0) rotate(180deg);
                            }
                            .btn .dot:nth-child(6) {
                                top: 0;
                                left: 0;
                                transform: rotate(225deg);
                            }
                            .btn .dot:nth-child(7) {
                                top: 0;
                                left: 50%;
                                transform: translate3d(-5px, 0, 0) rotate(270deg);
                            }
                            .btn .dot:nth-child(8) {
                                top: 0;
                                left: 100%;
                                transform: translate3d(-10px, 0, 0) rotate(315deg);
                            }
                            .btn .dot:before {
                                content: "";
                                position: absolute;
                                top: 0;
                                left: 0;
                                display: block;
                                width: 6px;
                                height: 6px;
                                background-color: #FDD835;
                                border-radius: 50%;
                                offset-path: path("M0 1c7.1 0 10.7 2 14.3 4s7.1 4 14.3 4 10.7-2 14.3-4 7.2-4 14.3-4 10.7 2 14.3 4 7.1 4 14.3 4 10.7-2 14.3-4 7.1-4 14.3-4 10.7 2 14.3 4 7.1 4 14.3 4 10.7-2 14.3-4 7.1-4 14.3-4 10.7 2 14.3 4 7.1 4 14.3 4");
                                offset-distance: 100%;
                                pointer-events: none;
                                opacity: 0;
                                transition: background 250ms, offset-distance 750ms, opacity 750ms;
                            }
                            .btn:active .dot:before {
                                offset-distance: 0;
                                opacity: 1;
                                transition: offset-distance 0ms, opacity 0ms;
                            }
作者使用 JavaScript 在 onClick 事件加入動畫,效果是點擊按鈕放掉滑鼠時才會播放動畫。以下改使用 CSS 的 :active 偽元素完成相似功能,不同之處在於點擊後馬上就會播放動畫。
                            <a href="javascript: void(0)" class="btn">
                                Button
                            </a>
                            .btn,
                            .btn:focus,
                            .btn:hover {
                                display: inline-block;
                                position: relative;
                                min-width: 200px;
                                border: none;
                                border-radius: 4px;
                                background-color: #ff0081;
                                color: #fff;
                                font-size: 1rem;
                                font-weight: bold;
                                text-align: center;
                                text-decoration: none;
                                text-transform: uppercase;
                                box-shadow: 0 2px 25px rgba(255, 0, 130, 0.5);
                                transition: transform ease-in 0.1s, box-shadow ease-in 0.25s;
                                padding: 10px 20px;
                            }
                            .btn:before,
                            .btn:after {
                                content: "";
                                display: block;
                                position: absolute;
                                width: 140%;
                                height: 100%;
                                left: -20%;
                                z-index: -1000;
                                transition: all ease-in-out 0.5s;
                                background-repeat: no-repeat;
                            }
                            .btn:before {
                                display: none;
                                top: -75%;
                                background-image: radial-gradient(circle, #ff0081 20%, transparent 20%), radial-gradient(circle, transparent 20%, #ff0081 20%, transparent 30%), radial-gradient(circle, #ff0081 20%, transparent 20%), radial-gradient(circle, #ff0081 20%, transparent 20%), radial-gradient(circle, transparent 10%, #ff0081 15%, transparent 20%), radial-gradient(circle, #ff0081 20%, transparent 20%), radial-gradient(circle, #ff0081 20%, transparent 20%), radial-gradient(circle, #ff0081 20%, transparent 20%), radial-gradient(circle, #ff0081 20%, transparent 20%);
                                background-size: 10% 10%, 20% 20%, 15% 15%, 20% 20%, 18% 18%, 10% 10%, 15% 15%, 10% 10%, 18% 18%;
                            }
                            .btn:after {
                                display: none;
                                bottom: -75%;
                                background-image: radial-gradient(circle, #ff0081 20%, transparent 20%), radial-gradient(circle, #ff0081 20%, transparent 20%), radial-gradient(circle, transparent 10%, #ff0081 15%, transparent 20%), radial-gradient(circle, #ff0081 20%, transparent 20%), radial-gradient(circle, #ff0081 20%, transparent 20%), radial-gradient(circle, #ff0081 20%, transparent 20%), radial-gradient(circle, #ff0081 20%, transparent 20%);
                                background-size: 15% 15%, 20% 20%, 18% 18%, 20% 20%, 15% 15%, 10% 10%, 20% 20%;
                            }
                            .btn:active {
                                transform: scale(0.9);
                                background-color: #e60074;
                                box-shadow: 0 2px 25px rgba(255, 0, 130, 0.2);
                            }
                            .btn:active:before {
                                display: block;
                                animation: anim-top ease-in-out 0.75s forwards;
                            }
                            .btn:active:after {
                                display: block;
                                animation: anim-bottom ease-in-out 0.75s forwards;
                            }
                            @keyframes anim-top {
                                0% {
                                    background-position: 5% 90%, 10% 90%, 10% 90%, 15% 90%, 25% 90%, 25% 90%, 40% 90%, 55% 90%, 70% 90%;
                                }
                                50% {
                                    background-position: 0% 80%, 0% 20%, 10% 40%, 20% 0%, 30% 30%, 22% 50%, 50% 50%, 65% 20%, 90% 30%;
                                }
                                100% {
                                    background-position: 0% 70%, 0% 10%, 10% 30%, 20% -10%, 30% 20%, 22% 40%, 50% 40%, 65% 10%, 90% 20%;
                                    background-size: 0% 0%, 0% 0%, 0% 0%, 0% 0%, 0% 0%, 0% 0%;
                                }
                            }
                            @keyframes anim-bottom {
                                0% {
                                    background-position: 10% -10%, 30% 10%, 55% -10%, 70% -10%, 85% -10%, 70% -10%, 70% 0%;
                                }
                                50% {
                                    background-position: 0% 80%, 20% 80%, 45% 60%, 60% 100%, 75% 70%, 95% 60%, 105% 0%;
                                }
                                100% {
                                    background-position: 0% 90%, 20% 90%, 45% 70%, 60% 110%, 75% 80%, 95% 70%, 110% 10%;
                                    background-size: 0% 0%, 0% 0%, 0% 0%, 0% 0%, 0% 0%, 0% 0%;
                                }
                            }
使用漸層背景搭配動畫。
                            <a href="javascript: void(0)" class="btn">
                                Button
                            </a>
                            .btn {
                                min-width: 200px;
                                border: none;
                                border-radius: 5px;
                                background: #ffffff;
                                color: #666666;
                                font-size: 1rem;
                                font-weight: bold;
                                text-align: center;
                                text-decoration: none;
                                text-transform: uppercase;
                                box-shadow: 0 6px 6px #06f;
                                padding: 10px 20px;
                            }
                            .btn:active {
                                background: #ff8888;
                                color: #ffffff;
                                box-shadow: none;
                                animation: anim 100ms;
                            }
                            @keyframes anim {
                                0% { background: radial-gradient(circle at center, rgba( 255, 125 , 125, 0 ) 0%, #ffffff 0%, #ffffff 100%); }
                                25% { background: radial-gradient(circle at center, rgba( 255, 125, 125, 0.3 ) 24%, #ffffff 25%, #ffffff 100%); }
                                50% { background: radial-gradient(circle at center, rgba( 255, 125, 125, 0.5 ) 49%, #ffffff 50%, #ffffff 100%); }
                                75% { background: radial-gradient(circle at center, rgba( 255, 125, 125, 0.8 ) 74%, #ffffff 75%, #ffffff 100%); }
                                100% { background: radial-gradient(circle at center, #ff8888 99%, #ffffff 100%, #ffffff 100%); color: #ffffff; }
                            }
使用 :after 偽元素搭配 padding 與 margin 製作綠色區塊,當點擊按鈕時,藉由控制 padding 與 margin 的數值實現綠色區塊由左下往右上放大的效果。
                            <a href="javascript: void(0)" class="btn">
                                Button
                            </a>
                            .btn,
                            .btn:focus {
                                position: relative;
                                min-width: 200px;
                                border: none;
                                border-radius: 4px;
                                background-color: #16a085;
                                color: #ffffff;
                                font-size: 1rem;
                                font-weight: bold;
                                text-align: center;
                                text-decoration: none;
                                text-transform: uppercase;
                                overflow: hidden;
                                transition-duration: 0.4s;
                                padding: 10px 20px;
                                box-shadow: 0 5px 15px #193047;
                            }
                            .btn:hover {
                                background: #ffffff;
                                box-shadow: 0px 2px 10px 5px #1abc9c;
                                color: #000000;
                            }
                            .btn:after {
                                content: "";
                                display: block;
                                position: absolute;
                                background: #1abc9c;
                                padding-top: 300%;
                                padding-left: 350%;
                                margin-left: -20px !important;
                                margin-top: -120%;
                                opacity: 0;
                                transition: all 0.8s
                            }
                            .btn:active:after {
                                padding: 0;
                                margin: 0;
                                opacity: 1;
                                transition: 0s;
                            }
Ripple 動畫
水波紋按鈕,可以單純透過背景的變化實現。
                            <a href="javascript: void(0)" class="btn">
                                Button
                            </a>
                            .btn,
                            .btn:focus {
                                position: relative;
                                min-width: 200px;
                                border: none;
                                border-radius: 2px;
                                background-position: center;
                                background-color: #2196f3;
                                color: #FFFFFF;
                                font-size: 1rem;
                                font-weight: bold;
                                text-align: center;
                                text-decoration: none;
                                text-transform: uppercase;
                                transition: background 0.8s;
                                padding: 10px 20px;
                                box-shadow: 0 0 4px #999;
                            }
                            .btn:hover {
                                color: #FFFFFF;
                                background: #47a7f5 radial-gradient(circle, transparent 1%, #47a7f5 1%) center/15000%;
                            }
                            .btn:active {
                                background-color: #6eb9f7;
                                background-size: 100%;
                                transition: background 0s;
                            }
在不使用 JavaScript 的狀況下,水波紋按鈕只能由中心向外擴散,就如同上一個按鈕一樣。如果要讓水波紋按鈕根據使用者點擊的位置向外擴散,就得使用到 JavaScript。
本文主要介紹純 CSS 按鈕,但由於水波紋按鈕是蠻常見的效果,因此在本文最後,收集了一個需要使用 JavaScript 的水波紋按鈕。
                            <a href="javascript: void(0)" class="btn">
                                Button
                            </a>
                            .btn,
                            .btn:focus,
                            .btn:hover {
                                position: relative;
                                min-width: 200px;
                                border: 0;
                                border-radius: 0.25rem;
                                background-color: #6200ee;
                                color: #ffffff;
                                font-size: 1rem;
                                font-weight: bold;
                                text-align: center;
                                text-decoration: none;
                                text-transform: uppercase;
                                overflow: hidden;
                                transition: background 400ms;
                                padding: 10px 20px;
                                box-shadow: 0 0 0.5rem rgba(0, 0, 0, 0.3);
                            }
                            .btn:hover {
                                background-color: #6e08ff;
                            }
                            .btn .ripple {
                                position: absolute;
                                border-radius: 50%;
                                transform: scale(0);
                                animation: anim 600ms linear;
                                background-color: rgba(255, 255, 255, 0.7);
                                user-select: none;
                                pointer-events: none;
                            }
                            @keyframes anim {
                                to { transform: scale(4); opacity: 0;}
                            }
                            window.onload = () => {
                                const button = document.getElementsByClassName(".btn")[0];
                                button.addEventListener("click", (event) => {
                                    const button = event.currentTarget;
                                    const circle = document.createElement("span");
                                    const diameter = Math.max(button.clientWidth, button.clientHeight);
                                    const radius = diameter / 2;
                                    circle.style.width = circle.style.height = diameter + "px";
                                    circle.style.left = event.offsetX - (diameter / 2) + "px";
                                    circle.style.top = event.offsetY - (diameter / 2) + "px";
                                    circle.classList.add("ripple");
                                    const ripple = button.getElementsByClassName("ripple")[0];
                                    if (ripple) {
                                        ripple.remove();
                                    }
                                    button.appendChild(circle);
                                });
                            };



0 則留言