
在 Ubuntu 安裝 Nginx + PHP + MariaDB 環境
網頁開發在 Ubuntu 作業系統中架設 PHP 開發環境是一項相對簡單工作。 作為一個基於 Debian 的 Linux 發行版,Ubuntu 提供了廣泛使用的軟體儲存庫,讓開發者能夠輕鬆安裝所需的工具和相依套件。 本文將介紹如何使用 APT 套件管理工具來安裝 Nginx、PHP 和 MariaDB,這是我自己常用的組合,在安裝上有問題的話,都歡迎留言討論。
更新 Ubuntu
在開始安裝之前,建議先更新系統。
                sudo apt update
                sudo apt upgrade -y
安裝 Nginx
-
STEP 1
打開終端機,並執行以下指令安裝 Nginx。
# 安裝 Nginx sudo apt install -y nginx -
STEP 2
Nginx 主要設定檔為 /etc/nginx/nginx.conf,這個設定檔會再引入 /etc/nginx/sites-enabled/ 目錄中的其他設定檔。 剛安裝好 sites-enabled 目錄中應該就有一個 default 的設定檔,您可以依據個人習慣將所有設定寫入這個檔案,也可以一個網站一個設定檔。 但目前先不用修改,等安裝好 PHP 再一併處理。
-
STEP 3
啟動 Nginx 服務,並設定開機自動啟動。
# 啟動前,檢查一下設定檔 nginx -t # 啟動 Nginx 服務 sudo systemctl start nginx # 關閉 Nginx 服務 sudo systemctl stop nginx # 開機自動啟動 sudo systemctl enable nginx -
STEP 4
啟動服務後,打開瀏覽器,網址輸入 http://localhost,如果設定無誤並正確啟動的話,就能看到以下畫面,即表示 Nginx 安裝完成。

安裝 PHP
-
STEP 1
打開終端機,並執行以下指令安裝 PHP。
# 安裝 apt 儲存庫 sudo add-apt-repository ppa:ondrej/php sudo apt update # 安裝 PHP sudo apt install -y php8.2 php8.2-fpm -
STEP 2
開啟 /etc/php/8.2/fpm/php.ini 設定檔,修改 display_errors 及 date.timezone 兩個參數,其他設定都先使用預設值即可。
                        # 開啟 php.ini
                        vim /etc/php/8.2/fpm/php.ini
; 預設應該就是 On,確認一下即可。 display_errors = On ; 記得把前面的分號(;)移除,分號表示註解。 date.timezone = Asia/Taipei -
STEP 3
修改 Nginx 設定檔,讓 Nginx 將 HTTP 請求轉發給 PHP FPM 處理。 開啟 /etc/nginx/sites-enabled/default,參考以下內容進行修改。
                        # 開啟 nginx.conf
                        vim /etc/nginx/sites-enabled/default
... (省略) ... upstream php_fpm { server 127.0.0.1:9000; } server { listen 80; server_name localhost; index index.php index.htm index.html; client_max_body_size 256M; root /var/www/html; charset utf-8; server_tokens off; location / { index index.php index.html index.htm; } location ~ \.php$ { try_files $fastcgi_script_name =404; include fastcgi_params; fastcgi_index index.php; fastcgi_pass php_fpm; fastcgi_param SERVER_SOFTWARE nginx; fastcgi_param SCRIPT_FILENAME $realpath_root$fastcgi_script_name; fastcgi_param DOCUMENT_ROOT $realpath_root; # PHP performance setup. fastcgi_buffers 8 16k; fastcgi_buffer_size 32k; fastcgi_connect_timeout 600; fastcgi_read_timeout 600; fastcgi_send_timeout 600; } } -
STEP 4
重啟 PHP-FPM 及 Nginx 服務。
# 重啟前,檢查一下設定檔 nginx -t # 重啟 Nginx 服務 sudo systemctl stop nginx # 重啟 PHP-FPM 服務 sudo systemctl stop php8.2-fpm -
STEP 5
接下來撰寫一個簡單的 PHP 程式測試。使用 vim 建立檔案,輸入以下程式碼,並使用檔名 index.php 存檔,最後將檔案放到 /var/www/html 目錄底下。
<?php phpinfo(); -
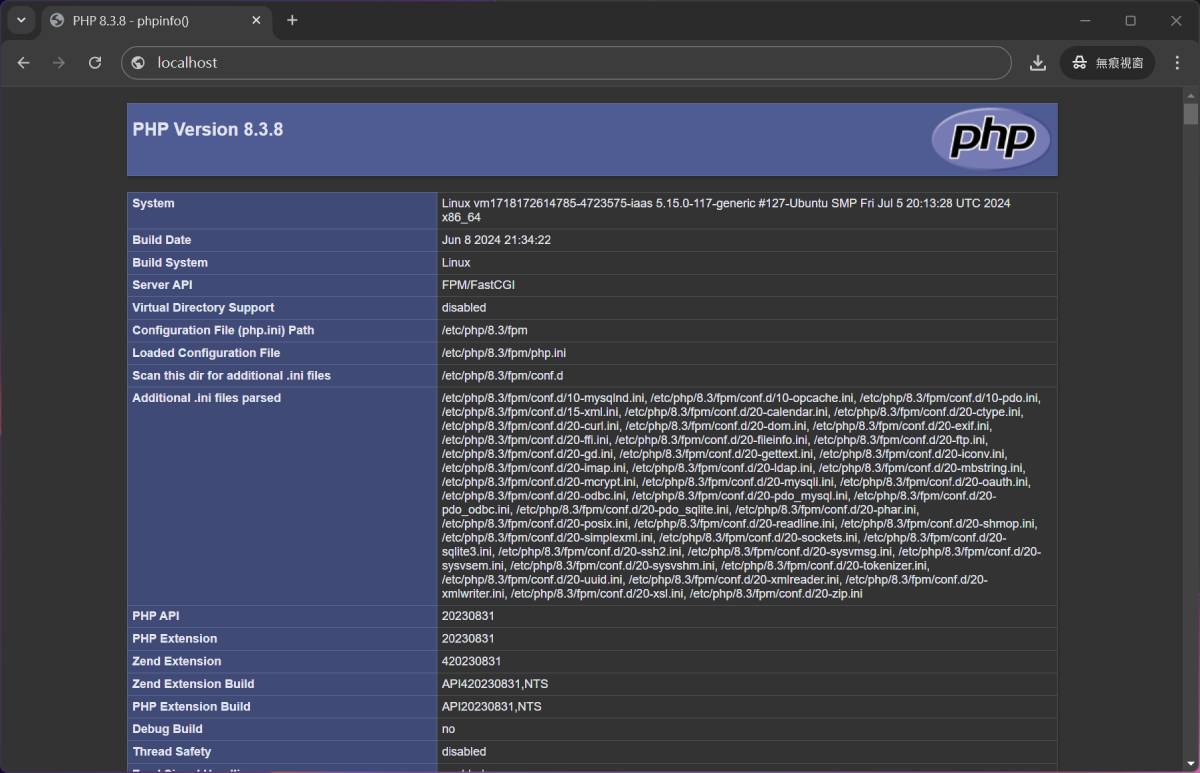
STEP 6
打開瀏覽器,網址輸入 http://localhost/,如果設定無誤並正確啟動的話,就能看到以下畫面,即表示 PHP 及 Nginx 都安裝完成,並且設定無誤。
安裝 MariaDB
首先先到官網下載頁面選擇您要安裝的作業系統、版本以及要安裝的 MariaDB 版本,之後按照說明一步一步執行指令就可以了。 以下是安裝在 Ubuntu 22.04,所以是選擇 Ubuntu 22.04 "jammy" > 11.4 > OSSPlanet + Ubuntu-TW - Ubuntu 台灣在地推廣組,然後按照畫面出現的指令安裝 apt 儲存庫。
-
STEP 1
打開終端機,並執行以下指令安裝 apt 儲存庫。
                        # 安裝金鑰
                        sudo apt-get install apt-transport-https curl
                        sudo mkdir -p /etc/apt/keyrings
                        sudo curl -o /etc/apt/keyrings/mariadb-keyring.pgp 'https://mariadb.org/mariadb_release_signing_key.pgp'
使用 vim 編輯 /etc/apt/sources.list.d/mariadb.sources,並填寫以下內容。
# MariaDB 11.4 repository list - created 2025-01-02 01:45 UTC # https://mariadb.org/download/ X-Repolib-Name: MariaDB Types: deb # deb.mariadb.org is a dynamic mirror if your preferred mirror goes offline. See https://mariadb.org/mirrorbits/ for details. # URIs: https://deb.mariadb.org/11.4/ubuntu URIs: https://ftp.ubuntu-tw.org/mirror/mariadb/repo/11.4/ubuntu Suites: jammy Components: main main/debug Signed-By: /etc/apt/keyrings/mariadb-keyring.pgp -
STEP 2
安裝 MariaDB 服務,並設定開機自動啟動。
# 安裝 MariaDB sudo apt-get update sudo apt-get install mariadb-server # 啟動 MariaDB 服務 sudo systemctl start mariadb # 關閉 MariaDB 服務 sudo systemctl stop mariadb # 開機自動啟動 sudo systemctl enable mariadb -
STEP 3
初始化資料庫。
mariadb-secure-installation初始化 MariaDB 會詢問幾個問題,如下:
- Enter current password for root (enter for none)
- 輸入 root 密碼,預設 MariaDB 沒有密碼,直接按 enter 就好了。
- Switch to unix_socket authentication [Y/n]
- 切換到 unix_socket 身份驗證,這是在 10.4.3 版新增的身份驗證方式,沒有強制使用,輸入 n。
- Change the root password? [Y/n]
- 修改資料庫 root 帳號密碼,輸入 y。
- New password
- 輸入要設定的 root 帳號密碼。
- Re-enter new password
- 再輸入一次輸入要設定的 root 帳號密碼。
- Remove anonymous users? [Y/n]
- 移除匿名帳號,輸入 y。
- Disallow root login remotely? [Y/n]
- 不允許遠端使用 root 帳號登入,這邊我是輸入 n,不過考量安全性應該要輸入 y。
- Remove test database and access to it? [Y/n]
- 移除測試資料庫與帳號,輸入 y。
- Reload privilege tables now? [Y/n]
- 重新載入權限設定,輸入 y。
-
STEP 4
最後,測試登入資料庫,如果登入成功,表示資料庫已經安裝完成了。
                        mariadb -u root -p
                        Enter password: <輸入剛剛設定的密碼>

                        Welcome to the MariaDB monitor.  Commands end with ; or \g.
                        Your MariaDB connection id is 262
                        Server version: 11.4.4-MariaDB-ubu2204 mariadb.org binary distribution

                        Copyright (c) 2000, 2018, Oracle, MariaDB Corporation Ab and others.

                        Type 'help;' or '\h' for help. Type '\c' to clear the current input statement.

                        MariaDB [(none)]>
常用目錄及檔案
Nginx
- /etc/nginx/nginx.conf
- Nginx 主設定檔。
- /etc/nginx/sites-enabled/
- Nginx 設定目錄。
- /var/log/nginx/access.log
- 存取紀錄 Log 檔,如果有使用者連入您的網站,這邊都會有紀錄。
- /var/log/nginx/error.log
- 錯誤紀錄 Log 檔,網頁伺服器產生的錯誤訊息。
- /var/www/html/
- 預設的網頁存放路徑,未來您寫的 HTML、CSS、JavaScript、PHP... 都放在這裡。
PHP
- /etc/php/[版號]/cli/php.ini
- 終端機執行時,使用的 PHP 設定檔。
- /etc/php/[版號]/fpm/php.ini
- 伺服器執行時,使用的 PHP 設定檔。
- /etc/php/[版號]/fpm/pool.d/www.conf
- PHP-FPM 設定檔。
MariaDB
- /etc/mysql/mariadb.cnf
- 資料庫設定檔。
參考資料
同系列文章如下:


0 則留言